What this blog is about

This is where Steve and Chris (feveredSteve and ChessQueen) will share the ups and downs of 2011's fun project: building a teardrop trailer.
We'll try and include all the detail we can, along with photos, so that you will know what worked and what didn't.

Monday 20 August 2012

At Notfest in the sunshine

Showing off the new awning for the back. Well its a tiny canopy really. Works fine as long as the rain stays on the far side of the yellow line :-)

But just look how happy and proud that builder looks ...


Here we have a shot of the car (tug) and trailer ready to roll. And Rhys bringing the washing up home again. (Rare shot that one).

Some SUL-worthy trailers

Here are the promised links. Some classy trailers (including our own of course) ... thanks to Sue Watts for posting the photos that I was too disorganised to take.


Yes, this one is us.  Here are some of our neighbours ...


from left to right is Wanda, T(b)ird and Grace with the glamorous fenders.

Then there was the Pod from Wales


Two little gems handmade by Bob (ali)  and Paul (blue and white)


Lots more pics in Sue's album of the event. All taken during a narrow window of opportunity between the rain, and the other lot of rain, and that bit of rain after that, and (you get the idea).


Tuesday 5 June 2012

SUL - a derbyshire adventure

Just back from a great (albeit wet) weekend in the Peak District. It was the venue for the biggest gathering of teardrops in the UK ever. Proud to be part of it.

Because of the weather and other distractions I left the photographing of teardrops to other people (feeble excuse and I will do a proper round up shortly linking to the doubtless superior shots of better photographers). For now I'll share some of the photos that I did take.

First, a photo of two of the best know teardroppers (Jackdaw modelling his cockrell-proof invention - well if you saw Chris's legs after a good pecking you would see the merit of these) and also Two Showers with the famed Frank (the dog). Rosie's choice of headgear is giveaway about the weather conditions (cold).


The next two shots are of the bookshop where we spent some time. Within 4 miles of the campsite (at Cromford) its reputed to be one of the 10 best bookshops in the world. Great cafe behind a hidden bookcase door and a fantastic toilet on the top floor. This is what these photos show. First photo shows the Hurry Up sign - and the second the bath! Fab


Okay, these are not teardrop-related images, but definitely in the same quirky ball-park.

Sunday 27 May 2012

What the fashion conscious teardrop builder is wearing ...

Well strictly speaking not this weekend as the weather has been extremely hot. But it came in handy in early May. Patch purchased from Warbird's business (see TCGB forums messages about the evolution of this design and info on how to order).


The garment, in the tradition of teardrop purchasing patterns was bought on ebay (army surplus and much needed in a barn with no doors).

Friday 25 May 2012

Sbeaky progress post ...

Things have been going pretty well for past week or so since we have A PLAN. This plan involves Steve having a whole gantt chart full of things to do. One is to finish off the outside of the trailer and we've been talking for a while about doing some form of camo (originally steampunk style) on those parts of it which are a different colour than the rest. This has come about because there was some strange variation in the sheets which we did not fully see until it was up and built.

So various plans were considered including Japanese style cherry blossom. But what we've gone for is a sort of fishscale tattoo motif, stenciled in blackboard paint. Here are some pics as describing it won't do. (Click pics to enlarge).


Here you can see the streaky bits when the wood was supplied with filler in a different colour. The stencil is part done and you can see where the use of washing liquid as lube on the cill over the door has dripped and stained the wood. At this stage you can still see this wood variation (not in a good way) pretty obviously. And here ...


... its a lot less obvious. And to avoid the overall flock wallpaper we are stopping here. Its a slightly different design on the other side. We like to think of this as a Yakusa (ie. Japanese mafia) cum Maori tribal tattoo - I think you *might* see what we have in mind.

Still work to be done, notably the replacing of what Rhys calls the 'eyebrow' above the door, the placement of the awning rail and the trim around the roof to finish that edge. Oh, and the wheel will get a paint job and the wood is going to get around 6 coats of clear Yacht varnish (at least).

The great thing about teardrop trailers that are home builds is that they have a distinctive look (no losing these in the car park or mistaking it for someone elses at a campsite). Looking forward to camping in it this summer.

Why is this a sneaky post? Because Steve did the hard work and I have stolen the edge and posted about it. Well I did have a lot of say in the design and we're both pleased with how its turning out. (Thanks Steve).

Chris

Tuesday 1 May 2012

A pivotal discovery

I've been worrying about the problem of how to attach the struts that hold up the tailgate for quite a while. But then I spotted some old castors that were lying around and I thought, "pivot... swivel..."

It was all that was needed. Ready made. So here's the first one in place. It's nice when things work out.

Sunday 22 April 2012

Beginning the next phase

This is the bit where we use the aluminium sheet off the roof of the dumped caravan to cover the nose, roof and tailgate of the teardrop. Because there were two holes in the caravan roof where a couple of vents/lights had been, I ended up with 4 pieces. They were around 3m, 2.5m, 1.75m and 1.25m long and a bit under 1m wide. This is the second longest piece.
The algae, lichen and bird poo cleaned off quite successfully with a bit of bleach, but I was going to use it upside down anyway so I just wanted to remove stuff that was going to be trapped inside. On the whole the aluminium wasn't in bad shape, the odd dent and scratch, but liveable with.

First of all the tailgate. The teardrop is 155cm wide and the tailgate length is a single 4ft width of plywood, so the two shorter pieces would do nicely and I'd have a piece left over for the more complicated jig saw on the main body. I cut the aluminium into 78cm widths which left some decent offcuts which will come in handy later.
This is the tailgate with the two pieces in place and a length of trim from the donor caravan along the bottom edge. Looking better already. Then added a piece of the central strip off the old caravan and put the hinge back on.  Then some "hockey stick" profile strip along the sides (had to buy this) - because I was attaching this to the 3.6mm ply at the edge here, I riveted these rather than use screws.  Here's the almost finished article.
Now to the main body. Unforunately, the length from the hinge to the bottom front edge was longer than my longest piece, so I needed to do some joining. First I loosened the bolts holding the body to the chassis and jacked up the front of the body so that I could slide in a piece to cover the join where the plywood skin meets the base. I put mastic along the edge of this piece and lowered the body on to the first 5cm, then bent the remaining 10cm up the front and attached it to the body.
Next came the longest piece. It was sheer luck, really, that all these bits of aluminium fitted exactly to where I'd got cross-members inside the skin. Or skill. Here it is in place.
Now came the piece I cut off when making the tailgate. And then the other longer piece. In this next photo you can see the orange luggage strap I used to hold the aluminium tight to the body while I attached it.
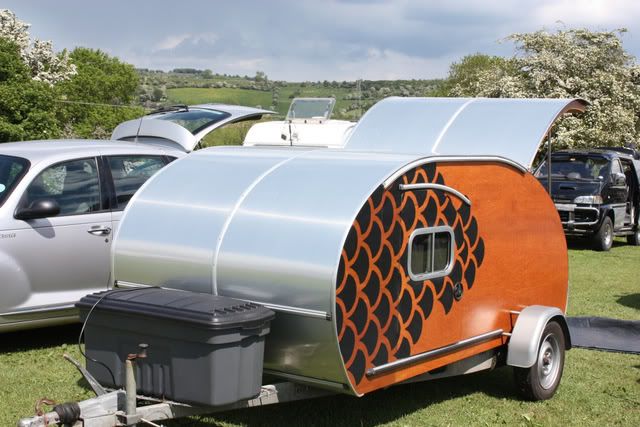
And here's one showing all sheets attached.
And this is the sate of play this morning. I've got varous bits of trim off the donor caravan attached. You can see the last piece of the central strip on the mesh tray at the front. Just needs to be cut to fit that lower bit.
We've bought some silver plastic strip cover the screw heads in the horizontal trim. Next job is to refit the tail gate. And I'm also pleased that I've got enough cabbage left over to cover the drop-down flap at the back. I aim to decorate and varnish the sides before finally attaching the edging strip. That's the plan anyway.


Thursday 22 March 2012

Not making progress with the teardrop but ...

We made a very neat potato cannon for Rhys' 15th birthday, shown here in action. An explosive success (you could say).


You are probably asking yourself what that thing its mounted on is. Well here is a closer look ...


Its a c.1940 device for mowing meadows. This is our 'spare' Allen Scythe. :-)


Rhys adjusts the aim while Steve stands ready with the can of lighter fuel to give it a bit of oomph so that it does this ...


Yes, it has quite a bit of force when hurling potatoes. Recommended book if you want to make one is this one on Backyard Ballisitics

We will be getting on with the teardrop shortly.

Chris